BRIWEB Employer Management Portal

Manage your plans through the secure BRIWEB Management Portal, which features robust reporting options, participant management capabilities, and convenient access to documentation.

Logging in

Explore the content below to get information on logging in for the first time, creating additional users, and learning what to do if you forget your login information. 

The Main Contact should do the following:

  1. Go to BenefitResource.com and select the Login button at the top right. Select the Employer or the Broker/Multi-Company login button, depending on how your account was originally set up.
  2. Select the “First-Time Login” link and enter your Login ID, which is your Employer Tax ID.
  3. A temporary link to create your password will be sent to the email you have on file with us. This can sometimes be routed to your junk/spam folder – please check there first. If you have not received it within 1 hour, please let us know.
  4. Click the link and create a secure password. Passwords should never be written down or shared. If another member needs a login, an additional login can be set up.
  5. Return to the BRI Employer Portal and enter your Login ID and Password.


If you do not have an email address on file with us or are not sure if you do, please contact your Assigned Client Specialist at (866) 996-5200, Monday through Friday, 8am to 8pm ET, to have your password reset.


For COBRA/Direct Billing administration: Click on the COBRA/Direct Billing tab to the left of your home screen to access the COBRA portal.  If this single sign on (SSO) feature is not yet activated, please email your dedicated COBRA administrator.

The Main Contact should login to the BRI Employer Portal and do the following:

  1. Click on your Company Name in the left-hand navigation menu.
  2. Click on Manage Users (it should be the middle option).
  3. On the right-hand side of the page, click on Add New User.
  4. Create a Login ID and enter the user’s email address. If you would like this user to be able to set up additional logins or disable current logins, make sure the Manage User box is checked.
  5. Click Submit.
  6. Make sure to provide the Login ID to the user so that once the login is created, they can register.


For COBRA/Direct Billing administration: If the new user needs access to the COBRA portal, please email your dedicated COBRA administrator to enable our single sign on (SSO) feature.

If you need assistance with your login, please contact your Assigned Account Manager at (866) 996-5200, Monday – Friday, 8am – 5pm (Eastern Time) or email clientoperations@benefitresource.com.

Select “Trouble Logging In?” on the Employer or the Broker/Multi-Company login screen, then select the “I Forgot my Password” button.


On the Forgot Password page, enter your login ID. A temporary link to reset your password will be sent to the email you have on file with us. If you do not have an email address on file with us or are not sure if you do, please contact your Assigned Account Manager at (866) 996-5200, Monday through Friday, 8am to 5pm ET to have your password reset.

Features

The BRIWEB Employer Management Portal allows employers to have instant and up-to-date information and access through a convenient web interface. Watch our video to get an introduction.


Still have questions? Review the sections below for additional information on the tabs that may be available to you. You can also download our Web Administration Overview Flyer for a high-level overview of what you need to know. Or, you can request a demo.

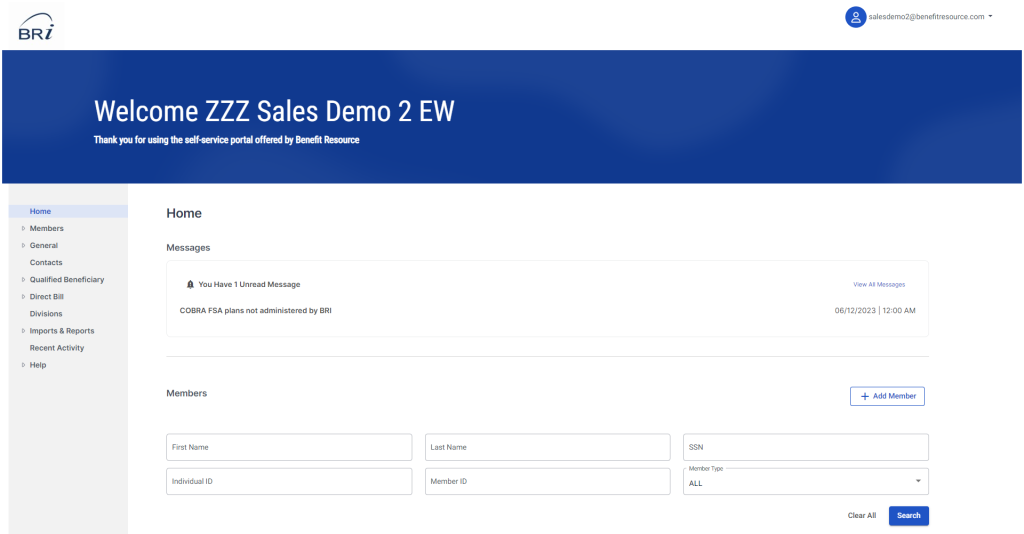
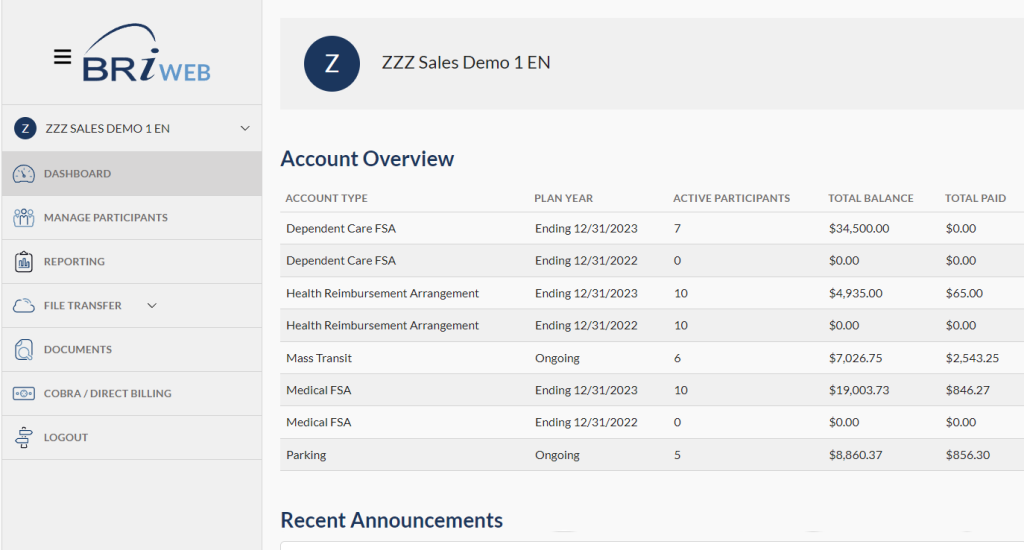
The “Dashboard” or homepage features an account summary, any announcements, bookmarked reports, and details on your assigned Account Manager.


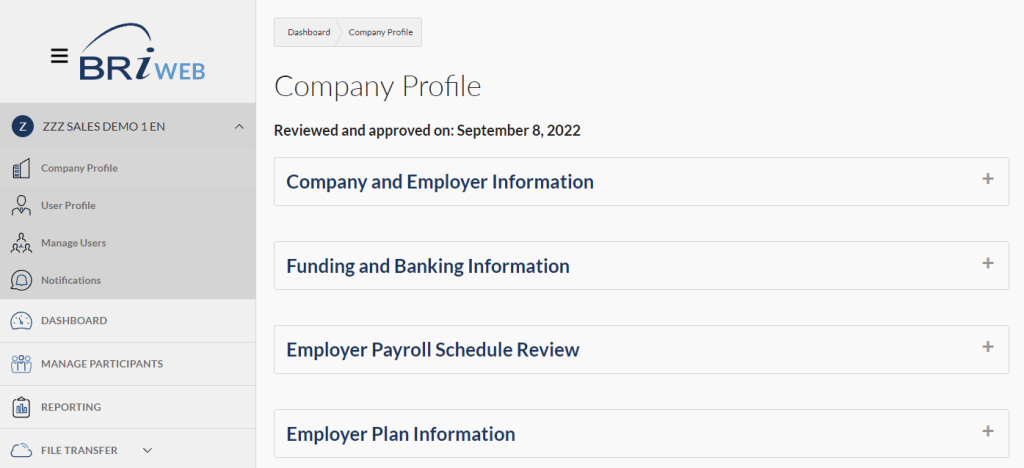
Expand your account name in the left navigation menu to view the “Company Profile” page. On this page, you can review Company, Employer, Banking, and Funding information, as well as individual payroll schedules and plan information.

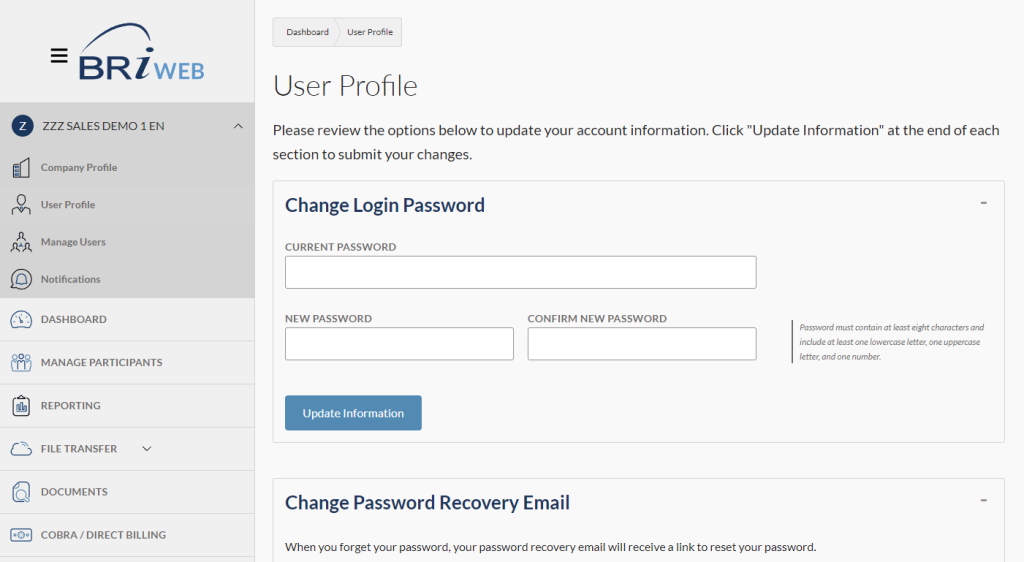
Expand your account name in the left navigation menu to view the “User Profile” page. This page allows you to update your login credentials or password recovery email.

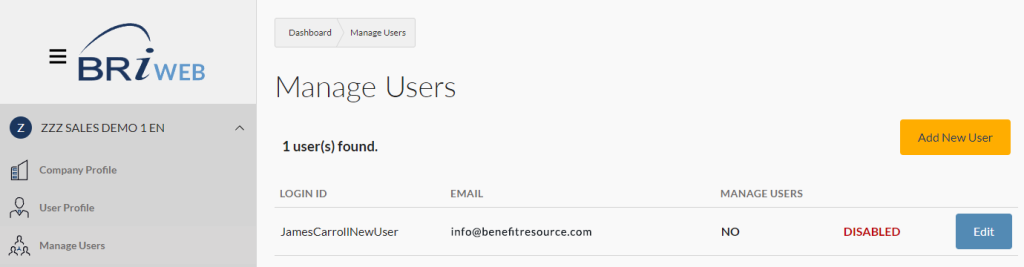
Expand your account name in the left navigation menu to access the “Manage Users” page. From here, you can create additional employer users with permissions of your choice.

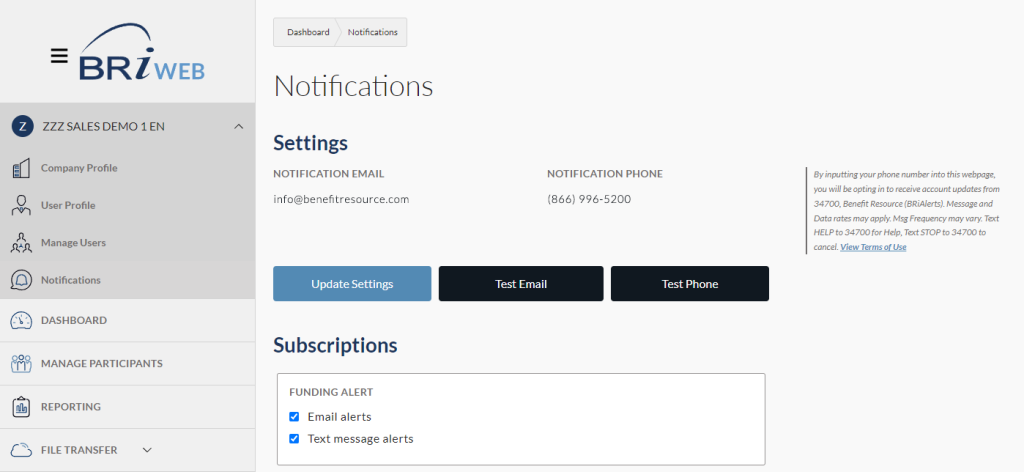
Expand your account name in the left navigation menu to get to the “Notifications” page. On this page, you can sign up for certain email and text alerts.

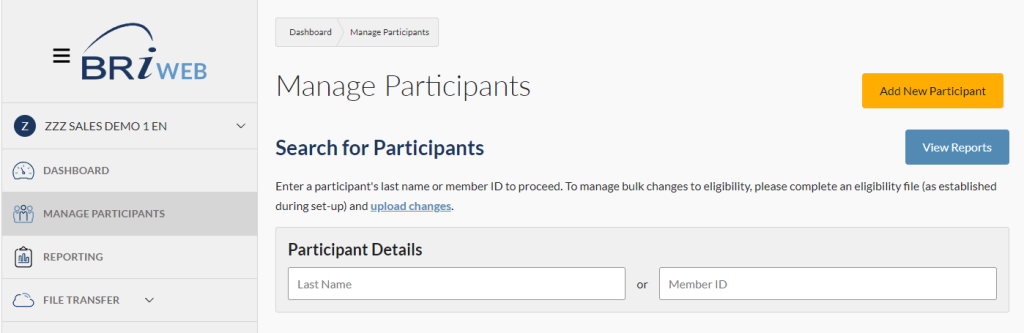
The “Manage Participants” tool provides a centralized and streamlined process for managing participants – whether you’re looking to add an employee, update demographic information, change eligibility, modify elections, or even terminate a participant. See the “Manage Participants” section on this page for additional information.

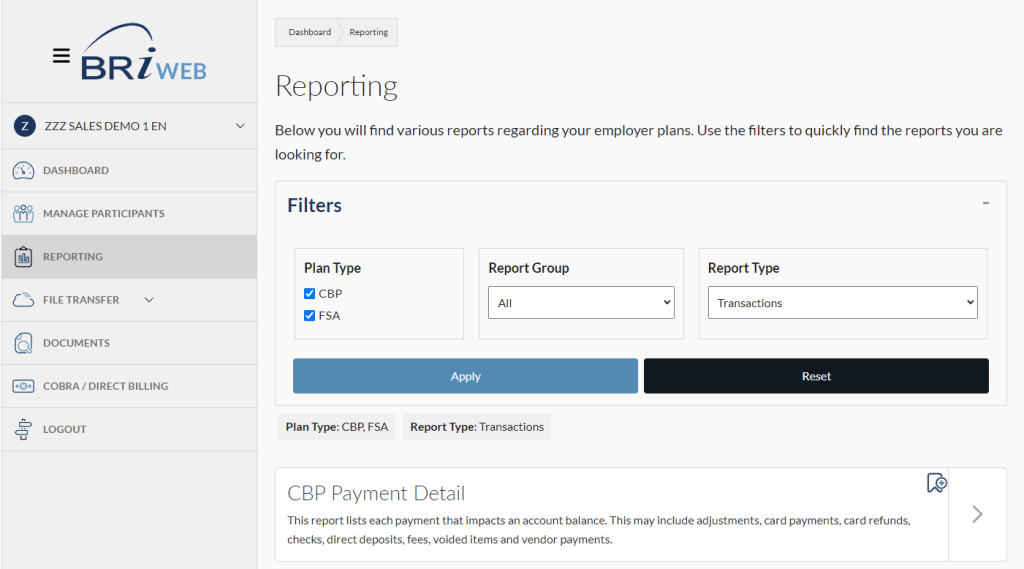
Quickly access all of your reporting needs from “Reports.” Use the filters to quickly identify the reports you’re looking for, and bookmark any you use on a regular basis. Each report can be sorted, filtered, and downloaded for your convenience. See the “Reporting” section on this page for additional information.

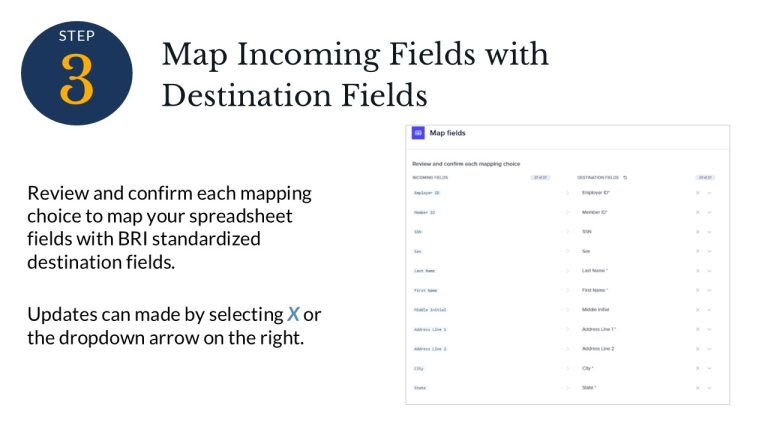
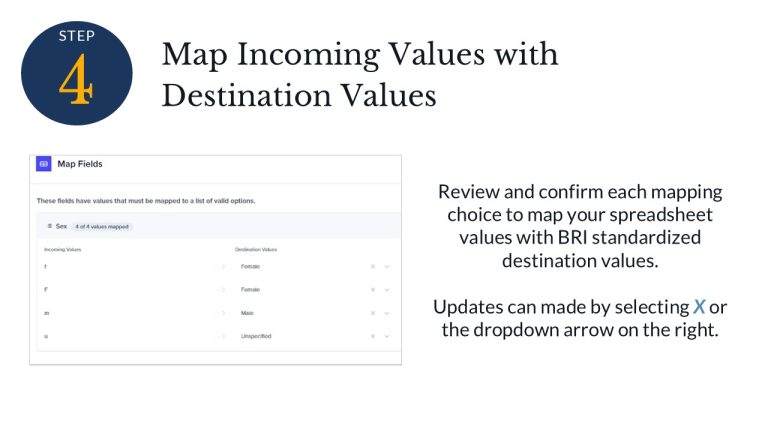
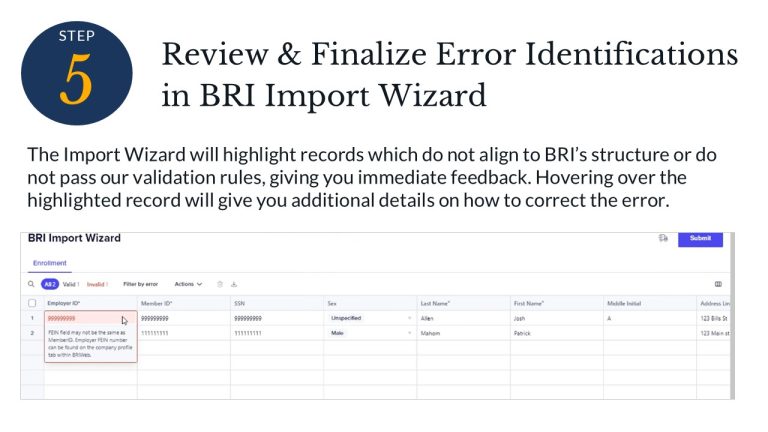
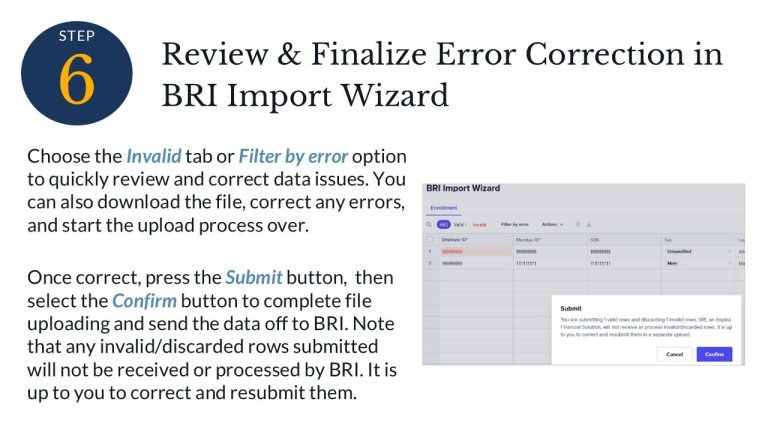
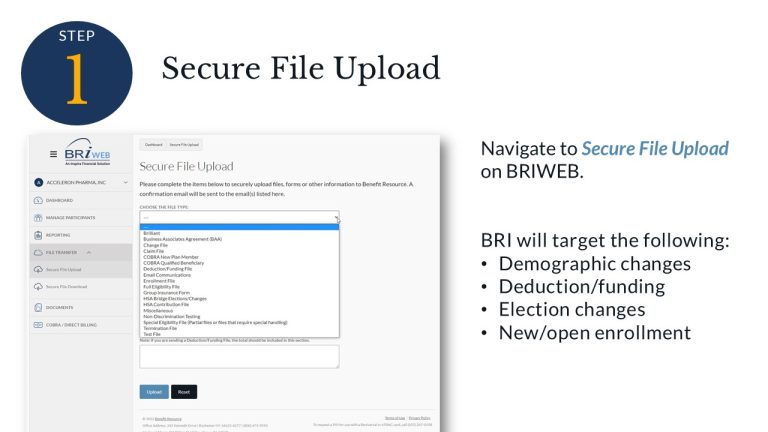
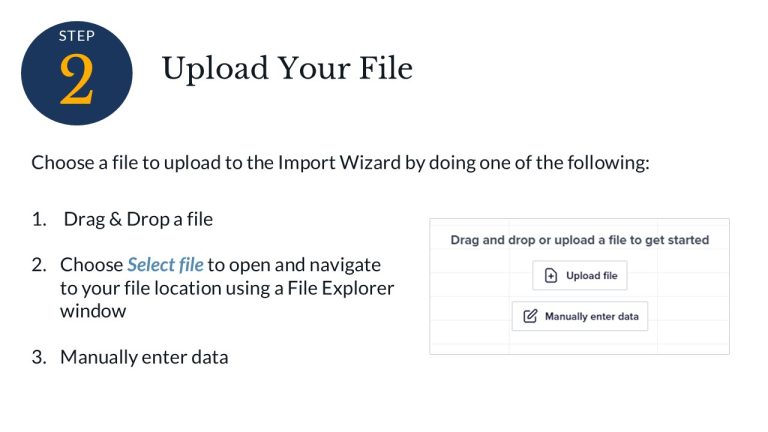
Under “File Transfer,” you can securely upload files, forms, or other information. Certain file types will take you to our BRI Import Wizard, which identifies errors and helps you get your data in the right format. See the “Import Wizard” section on this page for additional information.


Any files that BRI has made available to you will be available in the “Secure File Download” section for 60 days after posted.

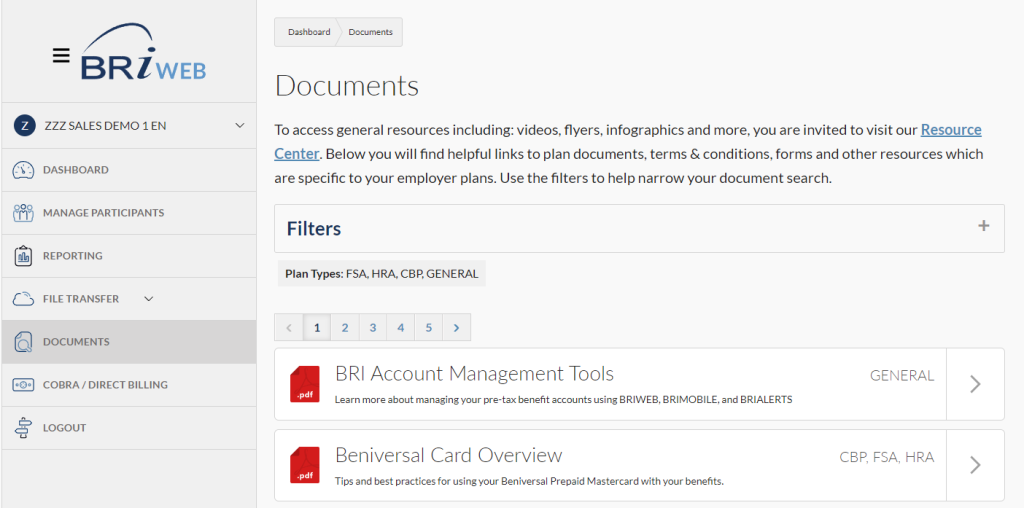
The “Documents” section allows you to conveniently access all of the documents and resources to manage your plan – including any customized resources or plan documents. You can filter the results to find what you’re looking for more easily. 

If BRI is your COBRA or Direct Billing Administrator, select “COBRA/Direct Billing,” and you’ll be automatically signed into the COBRA and Direct Bill management portal. See our BRI COBRA/Direct Bill Management Page for an overview of these management features.

Manage Participants

The “Manage Participants” section of BRIWEB allows you to add participants, manage eligibility and enrollments, and even term or close an account. Watch the video to get an introduction to this feature of the BRIWEB Management Portal.


Still have questions? Expand the sections below for additional information on the content covered in the video.

Here are the steps to add a single participant. Note, if you have bulk changes or additions, it is recommended that you submit an eligibility file through the “File Upload” option under “File Transfer.”

  1. Select the button to add a new participant.
  2. Complete basic profile information. This includes items such as member ID, name, address, birth date, and basic employment information.
  3. Select the plans that the individual is eligible for. This will list all the plans that are eligible for web enrollment.
  4. Select the pay cycle that applies for the specific plan.
  5. Select “submit eligibility.”

Search for participants by last name or member ID. Select “view details” to see more information about a particular person. Here, you will see a profile summary view. You can use this to make basic changes to demographic information.

Manage plan eligibility for web enrollment, if allowed by your plan.

  1. Search for participants by last name or member ID. Select “view details” to see more information about a particular person.
  2. Select “manage eligibility”, then select the eligible plan or plans.
  3. After you’ve made your selected changes, click “submit eligibility.” Once the employee information is saved, the employee will be able to log onto BRIWEB to enroll or make changes.

Please note that an individual cannot be removed from eligibility if they’ve already been enrolled in a plan.

Manage plan eligibility for web enrollment, if allowed by your plan.

  1. From the “Manage Participants” screen, click on the blue underlined “Eligibility File” link and download the file.
  2. Fill in the required demographic data and click “Save.”
  3. Upload the file through the “File Transfer” tab.
  4. Once the employee information is saved, the employee will be able to log onto BRIWEB to enroll or make changes.
  1. Within the “Participant Details” box, search for the Participant by Last Name or Member ID.
  2. Under “Plan Eligibility and Enrollment,” click  “Manage Enrollment.”
  3. Expand the plan section you want to modify and add the requested information. You may be prompted to provide additional details if required by the plan.
  4. When finished, select “Update Elections” to save the information.

Notes:

  • If a plan you wish to modify is not showing, you will have to make the participant eligible for that plan. (See “How to Maintain Eligibility, Individual Changes” above).
  • New enrollees will receive their cards approximately two weeks after the enrollment period is complete.
  • If changing an existing FSA election for the current plan year, you will be prompted for additional information regarding the effective date and reason for the change.
  1. On the “Manage Participants” screen, search for the Participant by Last Name or Member ID in the Participant Details box. Then, click “View Details.”
  2. Scroll down to the bottom of the page and click “Term Participant.”
  3. Enter the Month, Day, and Year of the effective date of the change. Then, click “Submit.”
  4. Save the Confirmation for your records.

Please allow up to two business days for a termination record to be reflected throughout the site reporting.

If you have a Commuter Benefit Plan, use the “close CBP account” option for an existing employee that will no longer be commuting, but is still employed by your company. If the employee is temporarily suspending elections or has a balance built up, you will want to change their election to zero but leave the account open.

Reports

The “Reporting” section of BRIWEB allows you to access, run, and download Plan, Financial, and Enrollment Reports. Watch the video to get an introduction to the reporting feature of the BRIWEB Management Portal.


Still have questions? Review the content below for additional information on the types of reports available through BRIWEB and how to use them. 

REPORT TYPES & DESCRIPTIONS

Below is a list of Plan, Financial, and Enrollment reports. This list may vary from the specific reports available under your account. To narrow down your search in BRIWEB, set the Report Group filter to the type of report and any Plan Type you want. Then, select “Apply.”

Under “Plan Reports“, you will find detailed account information including elections, deposits, and transaction reports per plan type.

  • Elections Summary: Displays a summary record for each participant account, including the account status, total deposits posted, total eligible transactions received, total transactions paid to date, and cash balance.
  • Deposits Detail: Lists each deposit posted to a participant account, along with the pay date/ funding date and the date posted by BRI.
  • Deposits Summary: Displays on record for each participant account reflecting the total of all deposits posted to date for that account along with any balance adjustments.
  • Elections Detail: Displays the election amount and the effective date for each participant account.
  • Transactions Detail: Lists each transaction (other than deposits) that impacts an account balance. Activity may include adjustments, card payments, card refunds, checks, direct deposits, fees, voided items, and/or vendor payments.
  • Transactions Summary: Displays one record for each participant account reflecting the total of all transactions (other than deposits) for that account.

Under “Financial Reports“, you will find funding, billing, and imputed income reports.

  • Funding Summary: Provides a line-item summary of each financial transaction, including the date and amount. Click through the report to view detailed funding by participant and account.
  • Billing Detail: This provides a list of billable participants across all plan types.
  • Card Activation Detail: This report provides a list of billable card issuance activities.
  • Imputed Income Detail: This report lists former employees and amounts that should be imputed as W-2 taxable wages.

Under “Enrollment Reports“, you will find web enrollment, activity reports, and a participant status summary. This report type will only be available if you offer online enrollment through BRIWEB.

  • Employee Eligibility & Enrollment: This report provides a per-participant view of eligible employees for commuter benefits, including the monthly mass transit and/or parking elections that have occurred.
  • Participant Status Detail: This report provides each employee’s employment status who enrolled in at least one benefit account during the current or prior plan year. Please allow 2-3 business days for recent changes to reflect in this report.
  • Continuous Enrollment Detail: This report summarizes enrollments and election changes occurring outside of the annual open enrollment period.

How to use reports

  • From the left navigation menu, click “Reporting“. When you first arrive at the reporting page, expand the filter to narrow down the list of reports by Report Group, Report Type, and Plan Type. Then apply the filter.
  • Select the icon to bookmark a report so that it shows up at the top of your reports and is pinned to the dashboard.
  • To open a report, select the arrow on the right of the box.  
  • There are a variety of filters available for each report to help better sort the information. These filters will vary by report.
  • Within each report, the information can be sorted by the various columns. Simply click on the blue column headers to apply the sort.
  • If you want to review one person’s details within the report, use the member ID or last name searcher.
  • When in a report, click on the “Download Report” button. Then select “Save File”.
  • Report downloads will automatically download to your browser’s preferred destination.
  • All files will download as a CSV and can be easily opened from Excel or other data management programs.

Not finding the report you're looking for?

Reach out to your assigned Account Manager to discuss your reporting needs. If you don’t know who your Account Manager is, you’ll find their name and contact information on the Dashboard of BRIWEB. 

File Import Wizard

The BRI Import Wizard streamlines the file uploading processes, facilitates faster funding, and eliminates risks to data integrity that result from manual file handling. With our first release, you’ll use the wizard for the following file types:

  • Demographic changes
  • Deduction/funding
  • Election changes
  • New/open enrollment
  • Termination notices

Watch the video to the right for a demo. Or, download the resources below.

How it works

Review BRI File Standards

Files that follow the same format and headers in our file standards will be automatically recognized. Click the buttons below to download BRI file standard templates. 

If your file uses a different format, you will be prompted to map the file on the initial import. After the initial mapping, the Import Wizard will remember how your data is organized.

GET STARTED – LOGIN TODAY

Visit the BRIWEB Management Portal today and start managing your benefit plans with BRI.